One of my first home automation projects over a decade ago was to make my 20 year old garage door opener smarter. Occasionally, our garage door had accidentally been left open overnight and I wanted to prevent it from happening again. The first iteration in 2015 was very simple and only sent notifications when the door was left open. The second one in 2025 added the ability to open/close the door, integrated with Home Assistant, etc.
The First Iteration - Particle Photon + Script (a little smarter)
In 2015 heard about the original particle.io Photon development boards and thought this would be a good project to test one out. The idea was pretty simple:
- attach a sensor to the Photon that could tell if the door was open or closed
- publish the state of the sensor to a variable in the Particle cloud
- run a script once a minute, check the state of the sensor, and send alerts if the door was left open
NOTE: Be sure to read the second iteration for a much more full featured solution.
Photon Hardware and Firmware
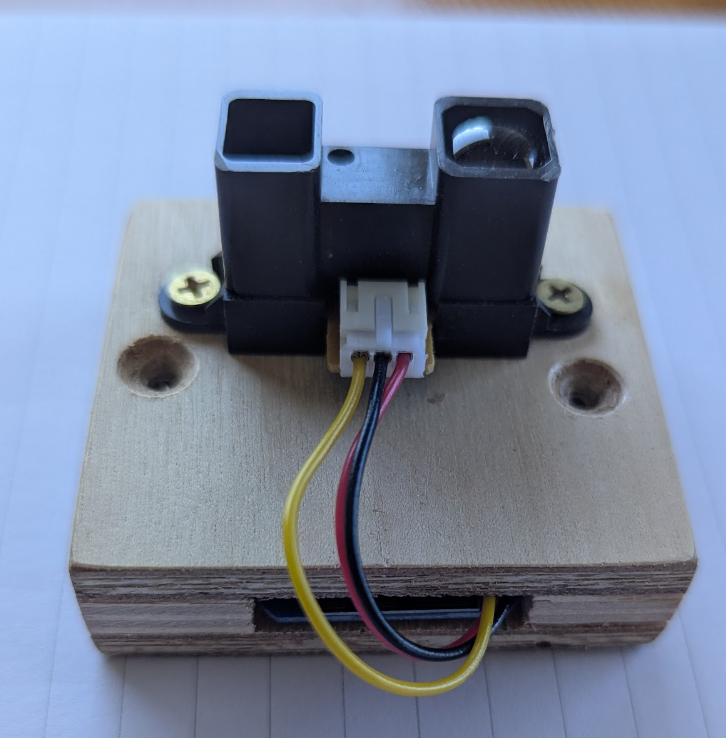
The garage ceiling is about 3 feet above my garage door when it is open, so I mounted the Photon on the ceiling with an
IR sensor pointing down. The sensor is wired to to the Photon via
power, ground, and analog pin A0. It reflects off the door when it is open and doesn’t when it is closed.
The Photon program measures the sensor value, average it over 5 seconds, and publish it to the cloud.
#define PIRPIN A0

int doorStatus = 0;

void setup() {
    // Setup variable that will be published - this is basically exposing this value to be queried
    // externally when someone comes to check it.
    Particle.variable("garageDoor", doorStatus);
}

void loop() {
    // measure every second and calculate avg value
    int sum = 0;
    int count = 5;
    for(int i = 0; i < count; i += 1) {
        delay(1000);
        sum += analogRead(PIRPIN);
    }

    // publish value by setting our variable
    doorStatus = sum/count;
}
Total cost for Photon and sensor was about $40.
Python Notification Script
Once you have published a variable to the Photon Cloud, it’s easy to check it from anywhere with a HTTP GET request. I set up a Python script on a Raspberry PI to run once a minute and send Slack notifications when the state changed or when the door was open for an extended period of time.
Click here to view the whole script …
#!/usr/bin/python3
#
# Create a config.json file with your variables like below:
#   {
#     "notifyChannelMinutes": 15,
#     "notifyIntervalMinutes": 15,
#     "notifyQuietStart": "8:00",
#     "notifyQuietEnd": "17:30",
#     "particle.url": "https://api.particle.io/v1/devices/{0}/{1}?access_token={2}&format=raw",
#     "particle.device": "[DEVICEID]",
#     "particle.variable": "garageDoor",
#     "particle.token": "[DEVICETOKEN]",
#     "slack.url": "https://hooks.slack.com/services/[SLACKDETAILS]",
#     "slack.channel": "home-garagedoor",
#     "slack.user": "home-pi"
#   }

import datetime
import dateutil.parser    # pip install python-dateutil
import logging
import logging.handlers
import json
import os
import pytz
import requests
import sys
import time

from slack_sdk.webhook import WebhookClient

appDir = os.path.dirname(os.path.realpath(sys.argv[0]))
now = datetime.datetime.now()

# Logging
appDir = os.path.dirname(os.path.realpath(sys.argv[0]))
logFormat = logging.Formatter('%(asctime)s: %(message)s')
log = logging.getLogger('check-door')
log.setLevel(logging.DEBUG)
logFile = logging.handlers.RotatingFileHandler(appDir + '/logs/check-door.log', maxBytes=1000000, backupCount=5)
logFile.setFormatter(logFormat)
log.addHandler(logFile)

# Manage config info
class AppConfig:
    def __init__(self):
        self.notify_quiet = False
        self.configJson = {}
        configFile = appDir + '/config.json'
        if os.path.isfile(configFile):
            self.configJson = json.loads(open(configFile).read())
            self.set_notify_quiet()

    def get(self, key):
        return self.configJson[key]

    def get_minutes_into_day(self, date):
        return (date.hour * 60) + date.minute

    def set_notify_quiet(self):
        now = self.get_minutes_into_day(datetime.datetime.now(pytz.timezone('US/Pacific')))
        start = self.get_minutes_into_day(datetime.datetime.strptime(self.get('notifyQuietStart'), "%H:%M"))
        end = self.get_minutes_into_day(datetime.datetime.strptime(self.get('notifyQuietEnd'), "%H:%M"))
        self.notify_quiet = (now >= start and now <= end)

# Load our previous door state from last time we ran
class AppState:
    def __init__(self):
        self.stateJson = {}
        self.stateCacheFile = appDir + '/cache/state.json'
        if os.path.isfile(self.stateCacheFile):
            self.stateJson = json.loads(open(self.stateCacheFile).read())

    def get(self, key):
        return self.stateJson[key]

    def getDate(self, key):
        return dateutil.parser.parse(self.stateJson[key])

    def set(self, key, value):
        self.stateJson[key] = value

    def isSet(self, key):
        return key in self.stateJson and self.stateJson[key] != None

    def save(self):
        with open(self.stateCacheFile, 'w') as fp:
            json.dump(self.stateJson, fp)

# Load our garage door state from sensor info published to Particle cloud
class DoorState:
    def __init__(self, config):
        self.valid = False
        self.open = False
        try:
            url = config.get('particle.url').format(config.get('particle.device'), config.get('particle.variable'), config.get('particle.token'))
            r = requests.get(url)
            self.value = int(r.text)

            # Ignore values if too large or small - assume something is wrong with sensor data.
            # Value is very consistently in the 200 range when closed.
            if self.value > 0 and self.value < 10000:
                self.valid = True
                if self.value > 800:
                    self.open = True
            log.debug('Value: {0}, Valid: {1}, Open: {2}'.format(self.value, self.valid, self.open))
        except Exception as e:
            log.exception("Error getting door value.")

        # When debugging it is useful to hard-code the value
        #self.open = True

# Logic to post to Slack API: https://api.slack.com/incoming-webhooks#sending_messages
class Slack:
    def __init__(self, config):
        self.config = config

    def send(self, msg):
        try:
            log.debug('Sending message: ' + msg)
            slack = WebhookClient(config.get('slack.url'))
            r = slack.send(text=msg)
            log.debug('Slack response: #{0} {1}'.format(r.status_code, r.body))
        except Exception as e:
            log.exception("Error sending message.")

# Load config and door state
config = AppConfig()
door = DoorState(config)
#door.open = True

if not door.valid:
    sys.exit()

# Check previous state
state = AppState()
openSince = None
if state.isSet('openSince'):
    openSince = state.getDate('openSince')
    openSinceDisplay = openSince.strftime('%Y-%m-%d %H:%M:%S')
    log.debug("Door has been open since " + openSinceDisplay)

msg = None
if door.open:
    # Flip our state flag to open if it is not already set
    if openSince is None:
        state.set('openSince', now.isoformat())
        openMinutes = 0
    else:
        openMinutes = (now - openSince).seconds/60

    # Only notify based on our notify interval - this keeps us from sending a Slack message every
    # time the sript runs (lets assume once per minute).
    sendNotification = True
    if state.isSet('lastOpenNotify'):
        lastOpenNotify = state.getDate('lastOpenNotify')
        sendNotification = ((now - lastOpenNotify).seconds/60) > config.get('notifyIntervalMinutes')

    if sendNotification:
        state.set('lastOpenNotify', now.isoformat())
        msg = 'Garage door is open.'
        if openMinutes > 0:
            msg = "Garage door has been open for " + str(round(openMinutes)) + " minute(s)."

            # If it has been open for more than specified minute threshold also specify @channel
            if openMinutes > config.get('notifyChannelMinutes') and not config.notify_quiet:
                msg = "<!channel>: " + msg
    else:
        log.debug("Skipping sending notification due to notification interval.")

else:
    # If door was previously open - clear open state and send a message it is now closed. We always
    # send this message - regardless of notify interval.
    if not openSince is None:
        state.set('openSince', None)
        state.set('lastOpenNotify', None)
        msg = 'Garage door is closed.'

# Send message if we have one to post
if not msg is None:
    slack = Slack(config)
    slack.send(msg)

# Save app state for next time
state.save()
Second Iteration - ESP32 + ESPHome + Home Assistant (much smarter)
While the first iteration solved the notification problem and was in use for a decade, there were a few features it
lacked. There was no mechanism to open/close the door remotely and it wasn’t built on Home Assistant like most of my
more recent projects. Integrating into Home assistant would also allow further automation like turning on the garage
lights when the door opens, sending alerts if the home is in AWAY mode, etc.
My garage door opener is a Genie ISD1000. You’ll need to check your garage door to see if it works in a similar manner, but many of these ideas should work across various types of garage door openers.
The Facepalm Moment 🤦
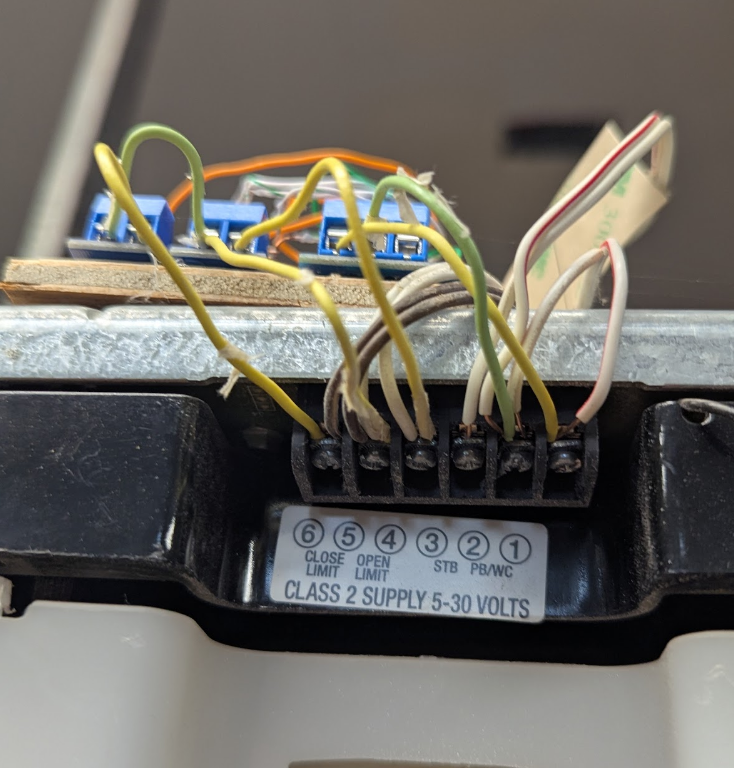
In order to open/close the garage door, I needed to understand how the existing wired buttons worked. My guess was that they opened or closed a circuit when pressed and I could mimic that via a WiFi connected relay. Using a small piece of wire to test, I found that briefly shorting the two terminals the button connected to on the controller to would open or close the door. Perfect!
I also noticed there were other wires comming to the garage door controller which I didn’t recall from when I originally installed it. After some quick investigation I realized these were two Reed Switches which allow the controller to know when the door is fully open or fully closed. Using a multi-meter, I found they had a 5v current when the switches were active. So I never needed that IR sensor in my first iteration after all - I just needed to monitor these existing switches!

So now I could entirely replace my first iteration by:
- monitor the voltage of the open + closed Reed switches to know door state - and because there are two sensors I can tell if it is fully open, fully closed, or somewhere in between.
- toggle a relay to trigger the door to open or close
- integrate this via an ESP32 and ESPHome into Home Assistant
The new sensors and switches will all be additive. Everything else can continue to work the way it does today so the wired wall switch, open/closed sensors, etc. will continue to act like normal.
Hardware
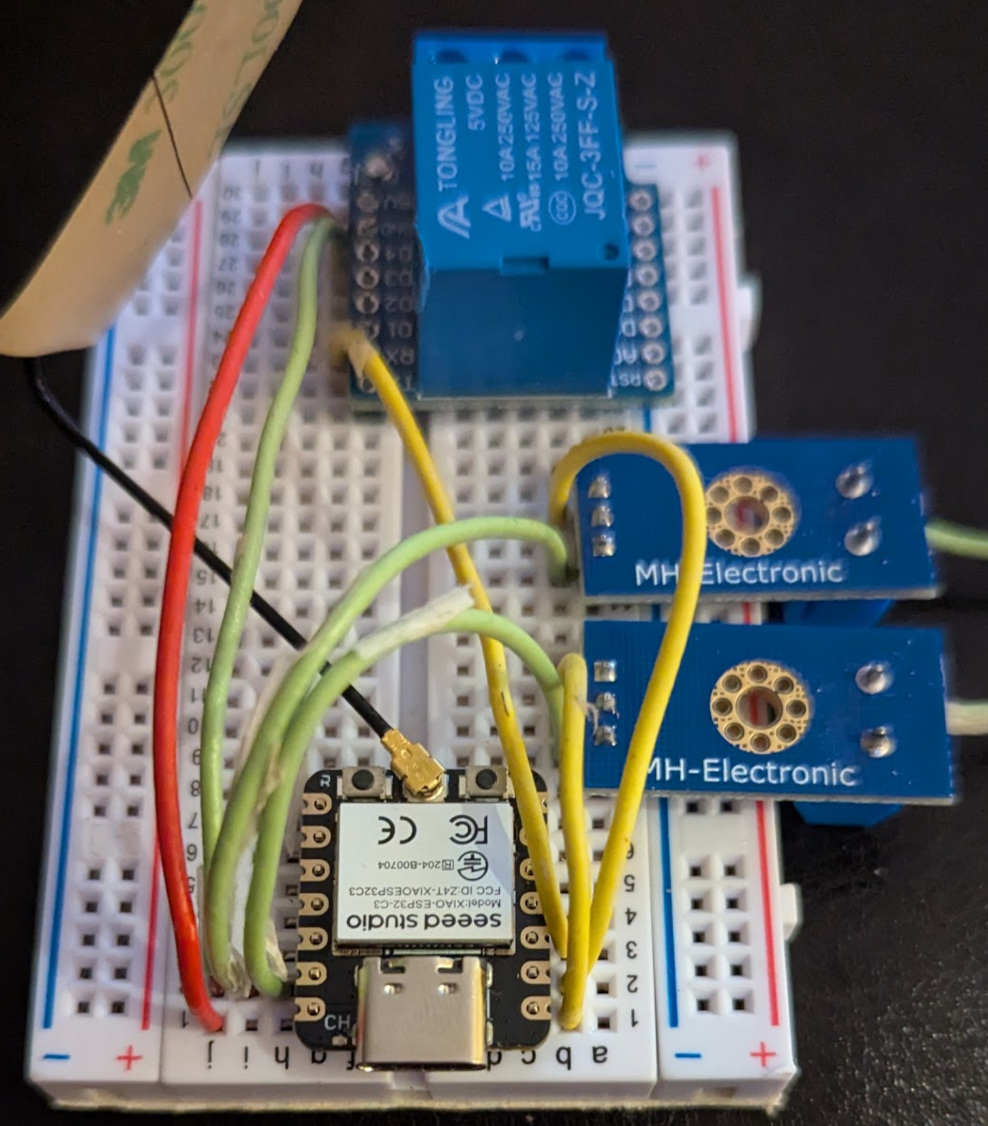
- ESP32-C3 - a simple ESP32 well suppored by ESPHome
- Relay - a basic 5v relay I had sitting around from prior projects
- Voltage Sensor x2 - a voltage sensor that measures 0-16.5v and outputs a safe voltage for ESP32s
NOTE: The voltage sensors might be overkill. The maximum input voltage of an ESP32 analog input is
3.3vbut it seemed to work with a5.0vinput as well. Using the voltage sensor ensures it doesn’t exceed the recommended value.
The total costs for hardware was less than $20.
Wiring Diagram
                                         USB-C Adapter
                                               |
                                 +-------------+-------------+
                                 |      USB (power in)       |
                                 +---------------------------+
                                 |                           |
                                 |           ESP32           |
                                 |                           |
                                 +---------------------------+
   +-----------------------------+ GPIO2                  5V +----------------+
   |                       +-----+ GPIO3                 GND +-- [ESP32-GND]  |
   |                       | +---+ GPIO4                     |                |
   |                       | |   +---------------------------+                |
   |                       | |                                                |
   |                       | +-------------------------------------+ +--------+
   |                       +-------+                               | |
   |                               |                               | |
   | +-----------------------+     | +-----------------------+     | | +-----------------------+
   | |  OPEN Voltage Sensor  |     | | CLOSED Voltage Sensor |     | | |         RELAY         |
   | +-----------------------+     | +-----------------------+     | | +-----------------------+
   | |   Output  |   Input   |     | |   Output  |   Input   |     | | |   Input   |   Output  |
   | +-----------------------+     | +-----------------------+     | | +-----------------------+
   +-+ VOUT      |       GND +---+ +-+ VOUT      |       GND +---+ | +-+ 5V        |       GND |---+
   +-+ GND       |       VCC +-+ | +-+ GND       |       VCC +-+ | +---+ D1        |           |   |
   | +-----------------------+ | | | +-----------------------+ | |   +-+ GND       |       VCC |-+ |
   +-- to [ESP32-GND]          | | +-- to [ESP32-GND]          | |   | +-----------------------+ | |
                               | |                             | |   +-- to [ESP32-GND]          | |
                               | +------+                      | |                               | |
                               +----+   |     +----------------+ |                               | |
                                    |   |     |   +--------------+                               | |
                                    |   |     |   |     +----------------------------------------+ |
                                    |   |     |   |     |   +--------------------------------------+
                                 +--+---+-----+---+-----+---+--+
                                 |  + | -  |  + | -  |  + | -  |
                                 +---------|---------|---------|
                                 |   Open  | Closed  | Switch  |
                                 +-----------------------------+
                                 |                             |
                                 |   Garage Door Controller    |
                                 |                             |
                                 +-----------------------------+
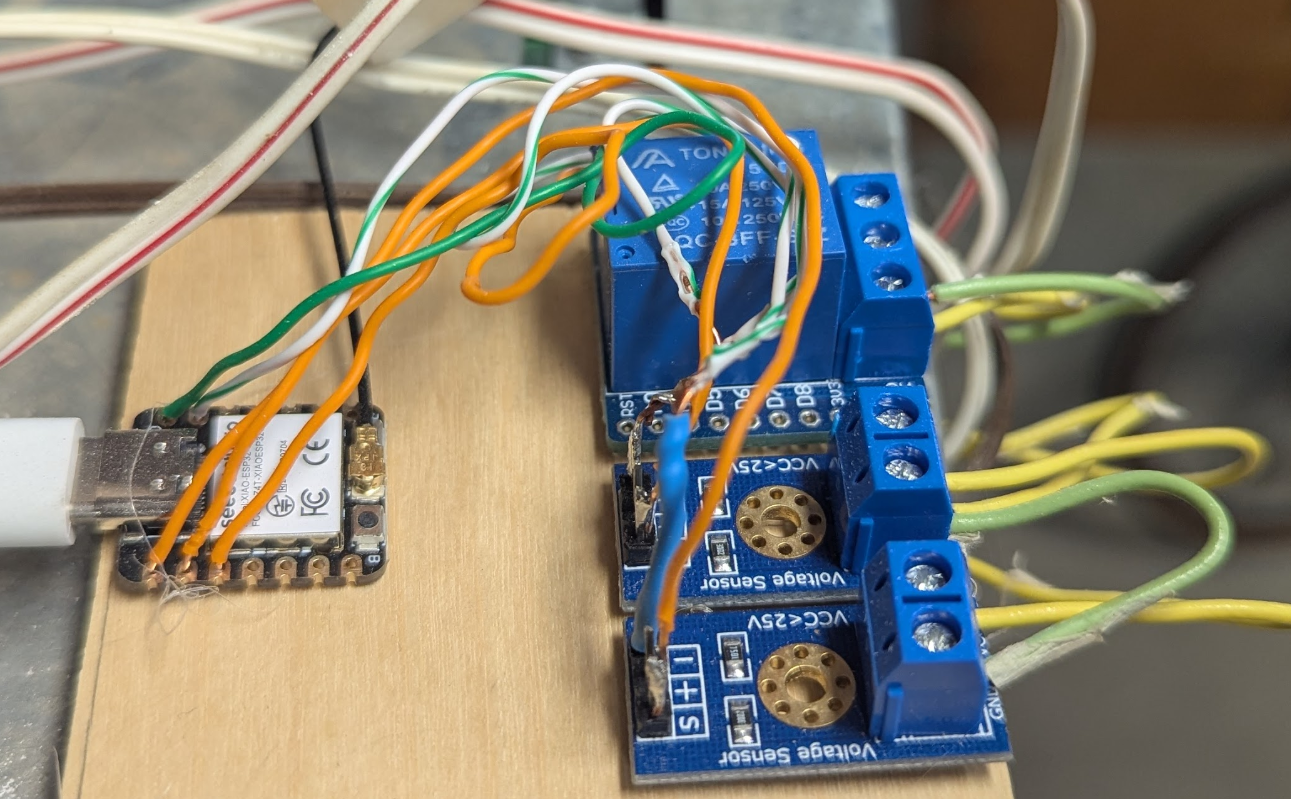
Picture of prototype before wiring to garage door controller.
ESPHome Configuration
Once the components were wired we can move on to configuring ESPHome to use our sensors and hook up to Home Assistant.
Voltage Sensors
We can leverage the ADC Sensors for measuring the voltage from the OPEN and CLOSED sensors.
sensor:
  - platform: adc
    pin:
      number: GPIO2
    id: sensor_door_open
    name: "sensor-door-open"
    update_interval: 1s
    attenuation: 2.5db
    internal: true

  - platform: adc
    pin:
      number: GPIO3
    id: sensor_door_closed
    name: "sensor-door-closed"
    update_interval: 1s
    attenuation: 2.5db
    internal: true
Once we have an analog sensor value, a Binary Sensor will convert it into a simple ON/OFF
if the analog value is over a specified threshold.
binary_sensor:
  - platform: analog_threshold
    id: door_closed
    name: "door-closed"
    sensor_id: sensor_door_closed
    threshold: 0.5
    # Don't use "garage" class as these are sensors - a "closed == ON" shows state as "OPEN"
    # device_class: garage
    icon: "mdi:garage"
    filters:
      - invert:
      - delayed_on_off: 50ms
    on_state:
      if:
        condition:
          binary_sensor.is_on: door_closed
        then:
          - logger.log: "Garage door is closed"
        else:
          - logger.log: "Garage door is opening"

  - platform: analog_threshold
    id: door_open
    name: "door-open"
    sensor_id: sensor_door_open
    threshold: 0.5
    # Don't use "garage" class as these are sensors - a "closed == ON" shows state as "OPEN"
    # device_class: garage
    icon: "mdi:garage-open"
    filters:
      - invert:
      - delayed_on_off: 50ms
    on_state:
      if:
        condition:
          binary_sensor.is_on: door_open
        then:
          - logger.log: "Garage door is open"
        else:
          - logger.log: "Garage door is closing"
A GPIO Switch can be used to trigger the relay. Note how we briefly turn ON the relay and
then schedule it to turn OFF after 250ms. This is enough to trigger the garage door opener to start a door OPEN or CLOSE process.
switch:
  - platform: gpio
    pin: GPIO4
    name: "door-relay"
    id: door_relay
    internal: true
    on_turn_on:
      - delay: 250ms
      - switch.turn_off: door_relay
Now we can combine this all into a Cover Component which will provide a nice Home Assistant interface
to see the state of the door and to allow us to trigger an OPEN or CLOSE via the buttons. This part was the most confusion
and hard part of the configuration to get right - especially if the door is stopped while opening or closing. It still isn’t perfect but it has been
working smoothly enough.
cover:
  - platform: feedback
    name: "Door"
    device_class: garage

    has_built_in_endstop: true
    max_duration: 20s

    open_action:
      - switch.turn_on: door_relay
    open_duration: 8s
    open_endstop: door_open

    close_action:
      - switch.turn_on: door_relay
    close_duration: 14s
    close_endstop: door_closed

    stop_action:
      - switch.turn_on: door_relay
Click here to view the entire ESPHome config…
esphome:
  name: iot-garage-door-controller
  friendly_name: iot-garage-door-controller
  on_boot:
    priority: -100
    then:
      - logger.log:
          level: INFO
          format: "The garage door booted with closed state %.1f and open state %.1f"
          args: [ 'id(door_closed).state', 'id(door_open).state' ]
      - if:
          condition:
            binary_sensor.is_on: door_closed
          then:
            - text_sensor.template.publish:
                id: door_state
                state: "Closed"
      - if:
          condition:
            binary_sensor.is_on: door_open
          then:
            - text_sensor.template.publish:
                id: door_state
                state: "Open"

esp32:
  board: seeed_xiao_esp32c3

# Enable logging
logger:
  # Uncomment to switch from DEBUG to INFO level output
  #level: INFO

# Enable Home Assistant API
api:
  encryption:
    key: !secret api_key

ota:
  - platform: esphome
    password: !secret ota_pwd

wifi:
  ssid: !secret wifi_ssid
  password: !secret wifi_password

web_server:
  port: 80
  ota: false

captive_portal:

# A text value we update as door opens and closes
text_sensor:
  - platform: template
    name: "Door State"
    id: door_state

binary_sensor:
  # Convert the analog sensor values into an ON/OFF binary sensor
  - platform: analog_threshold
    id: door_closed
    name: "door-closed"
    sensor_id: sensor_door_closed
    threshold: 0.5
    # Don't use "garage" class as these are sensors - a "closed == ON" shows state as "OPEN"
    # device_class: garage
    icon: "mdi:garage"
    filters:
      - invert:
      - delayed_on_off: 50ms
    on_state:
      if:
        condition:
          binary_sensor.is_on: door_closed
        then:
          - logger.log: "Garage door is closed"
          - text_sensor.template.publish:
              id: door_state
              state: "Closed"
        else:
          - logger.log: "Garage door is opening"
          - text_sensor.template.publish:
              id: door_state
              state: "Opening"

  - platform: analog_threshold
    id: door_open
    name: "door-open"
    sensor_id: sensor_door_open
    threshold: 0.5
    # Don't use "garage" class as these are sensors - a "closed == ON" shows state as "OPEN"
    # device_class: garage
    icon: "mdi:garage-open"
    filters:
      - invert:
      - delayed_on_off: 50ms
    on_state:
      if:
        condition:
          binary_sensor.is_on: door_open
        then:
          - logger.log: "Garage door is open"
          - text_sensor.template.publish:
              id: door_state
              state: "Open"
        else:
          - logger.log: "Garage door is closing"
          - text_sensor.template.publish:
              id: door_state
              state: "Closing"

switch:
  - platform: gpio
    pin: GPIO4
    name: "door-relay"
    id: door_relay
    internal: true
    on_turn_on:
      - delay: 250ms
      - switch.turn_off: door_relay

sensor:
  - platform: uptime
    name: "uptime"

  - platform: wifi_signal
    name: "wifi-strength"
    update_interval: 60s

  - platform: adc
    pin:
      number: GPIO2
    id: sensor_door_open
    name: "sensor-door-open"
    update_interval: 1s
    attenuation: 2.5db
    internal: true

  - platform: adc
    pin:
      number: GPIO3
    id: sensor_door_closed
    name: "sensor-door-closed"
    update_interval: 1s
    attenuation: 2.5db
    internal: true

cover:
  - platform: feedback
    name: "Door"
    device_class: garage

    has_built_in_endstop: true
    max_duration: 20s

    open_action:
      - switch.turn_on: door_relay
    open_duration: 8s
    open_endstop: door_open

    close_action:
      - switch.turn_on: door_relay
    close_duration: 14s
    close_endstop: door_closed

    stop_action:
      - switch.turn_on: door_relay
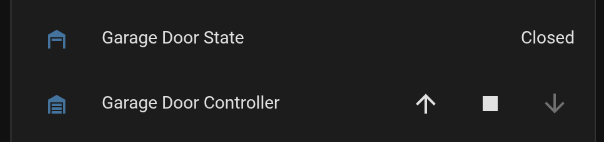
Home Assistant Integration
Once the ESPHome device is added in Home Assistant you can see it’s configuration and interact with the sensors and cover.

I’ve also added the key information to my main home dashboard.
Automated Notifications
It is now easy to send notifications on any garage door OPEN or CLOSE event. This uses a combination of PyScript
and Slack notifications.
@state_trigger("binary_sensor.iot_garage_door_controller_door_closed")
def garage_door(trigger_type, value, old_value, context=None):
    if old_value == "on" and value == "off":
        notify_garage_door_state("opened")
    elif old_value == "off" and value == "on":
        notify_garage_door_state("closed")

def notify_garage_door_state(state):
    msg = f"Garage door { state } @ { dt.now().strftime('%H:%M:%S') }."
    notify.slack(title=f"Garage door { state }", message=msg)
There is also an hourly reminder notification if the door has been open for more than 45 minutes.
@time_trigger("cron(0 * * * *)")
@state_active("binary_sensor.iot_garage_door_controller_door_closed == 'off'")
def garage_door_hourly_reminder():
    last_changed = binary_sensor.iot_garage_door_controller_door_closed.last_changed
    now = dt.now(tz.utc)
    opened_minutes = (now - last_changed).total_seconds()/60
    if opened_minutes > 45:
        msg = f"Garage door has been open for { round(opened_minutes) } minutes."
        notify.slack(title=f"Garage door still open", message=msg)
Future Improvements
This project has been working great but there are a few obvious improvements.
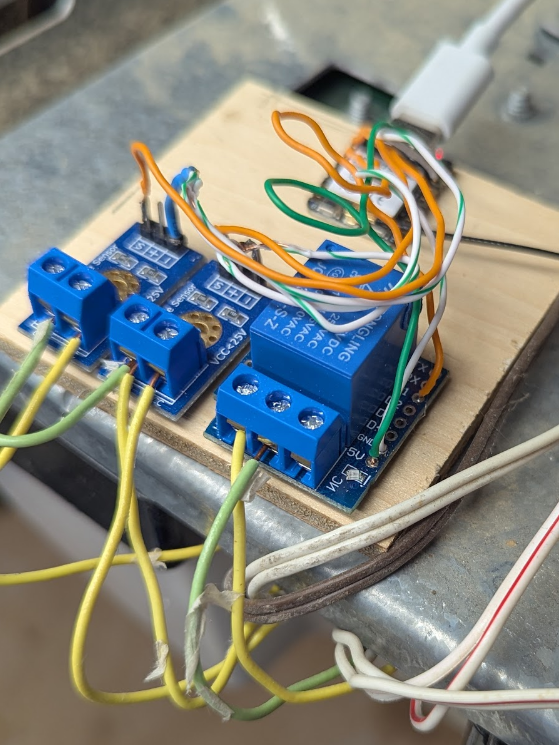
- clean up the wiring & solder work - it was done quickly with some leftover wires (mostly old CAT5) that were around and is not the best
- if/when I get a 3D printer, create a nice case for device (it is currently just hot-glued to a piece of wood)
Other Solutions and Information
There are other pre-built solutions available for garage doors if you are not interested in building your own. Here are a few I’ve heard decent things about.