As with many in the self-hosting community, one of the reasons I chose to self-host is ownership of my data. I always prefer to maintain control over my data rather than relinquish it to a third party - especially when they might not have the same priorities I do.
I recently purchased an Emporia Vue 3 to allow me better visibility into energy usage around my house. While the stock Home Assistant Cloud integration worked fine, this post describes how I flashed ESPHome onto the device and moved the data out of Emporia’s cloud to my local Home Assistant instance.
Installing the Vue
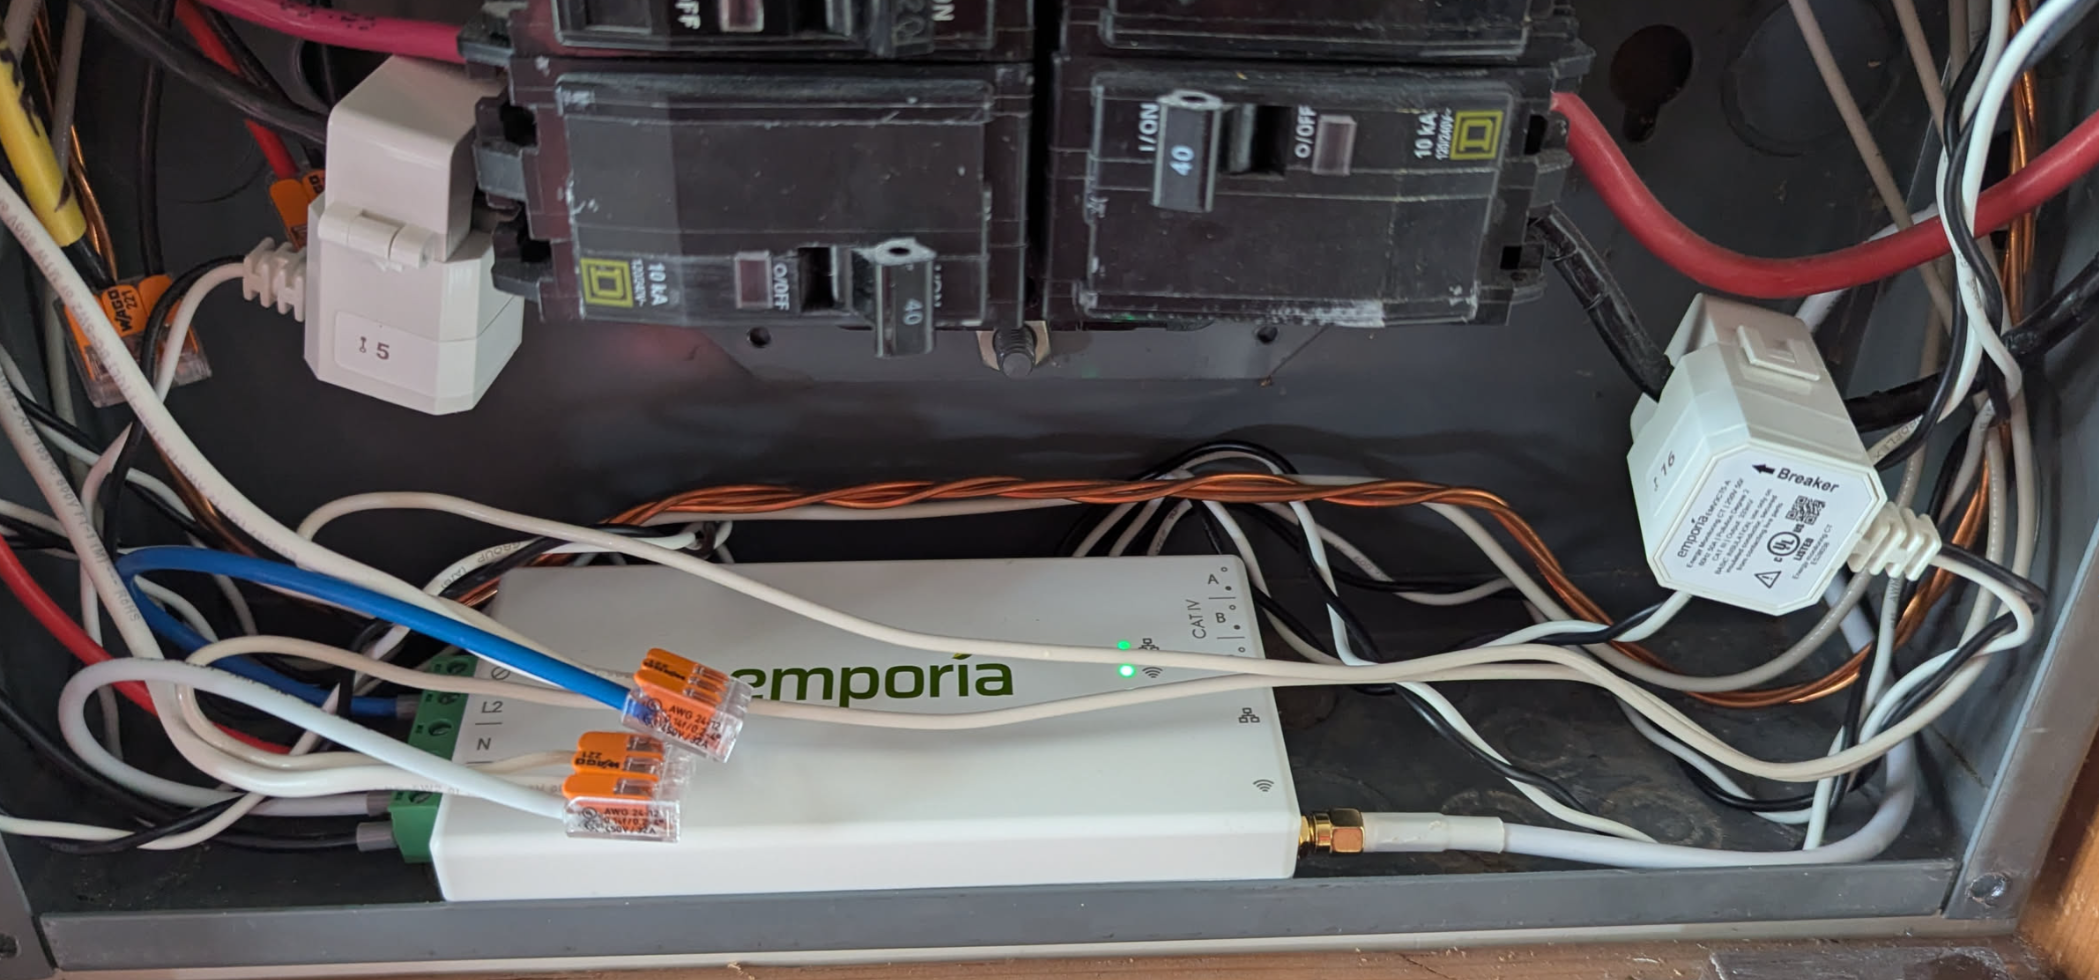
Install was pretty smooth despite my circuit panel being an absolute mess (we had some rather incompetent electricians work on it during a remodel ~8 years back). The biggest issue was there just wasn’t enough room around the main power lines to install the CT clamps. I already get power usage data from my electric company (2 days delayed) so I’ll live with this for the meantime.
ESPHome Vue Project
There has been an impressive amount of work done to build an ESPHome component
for the Vue 2 and 3. Especially the work that digiblur has done to make the process very accessible via his
blog post and YouTube Video.
Soldering
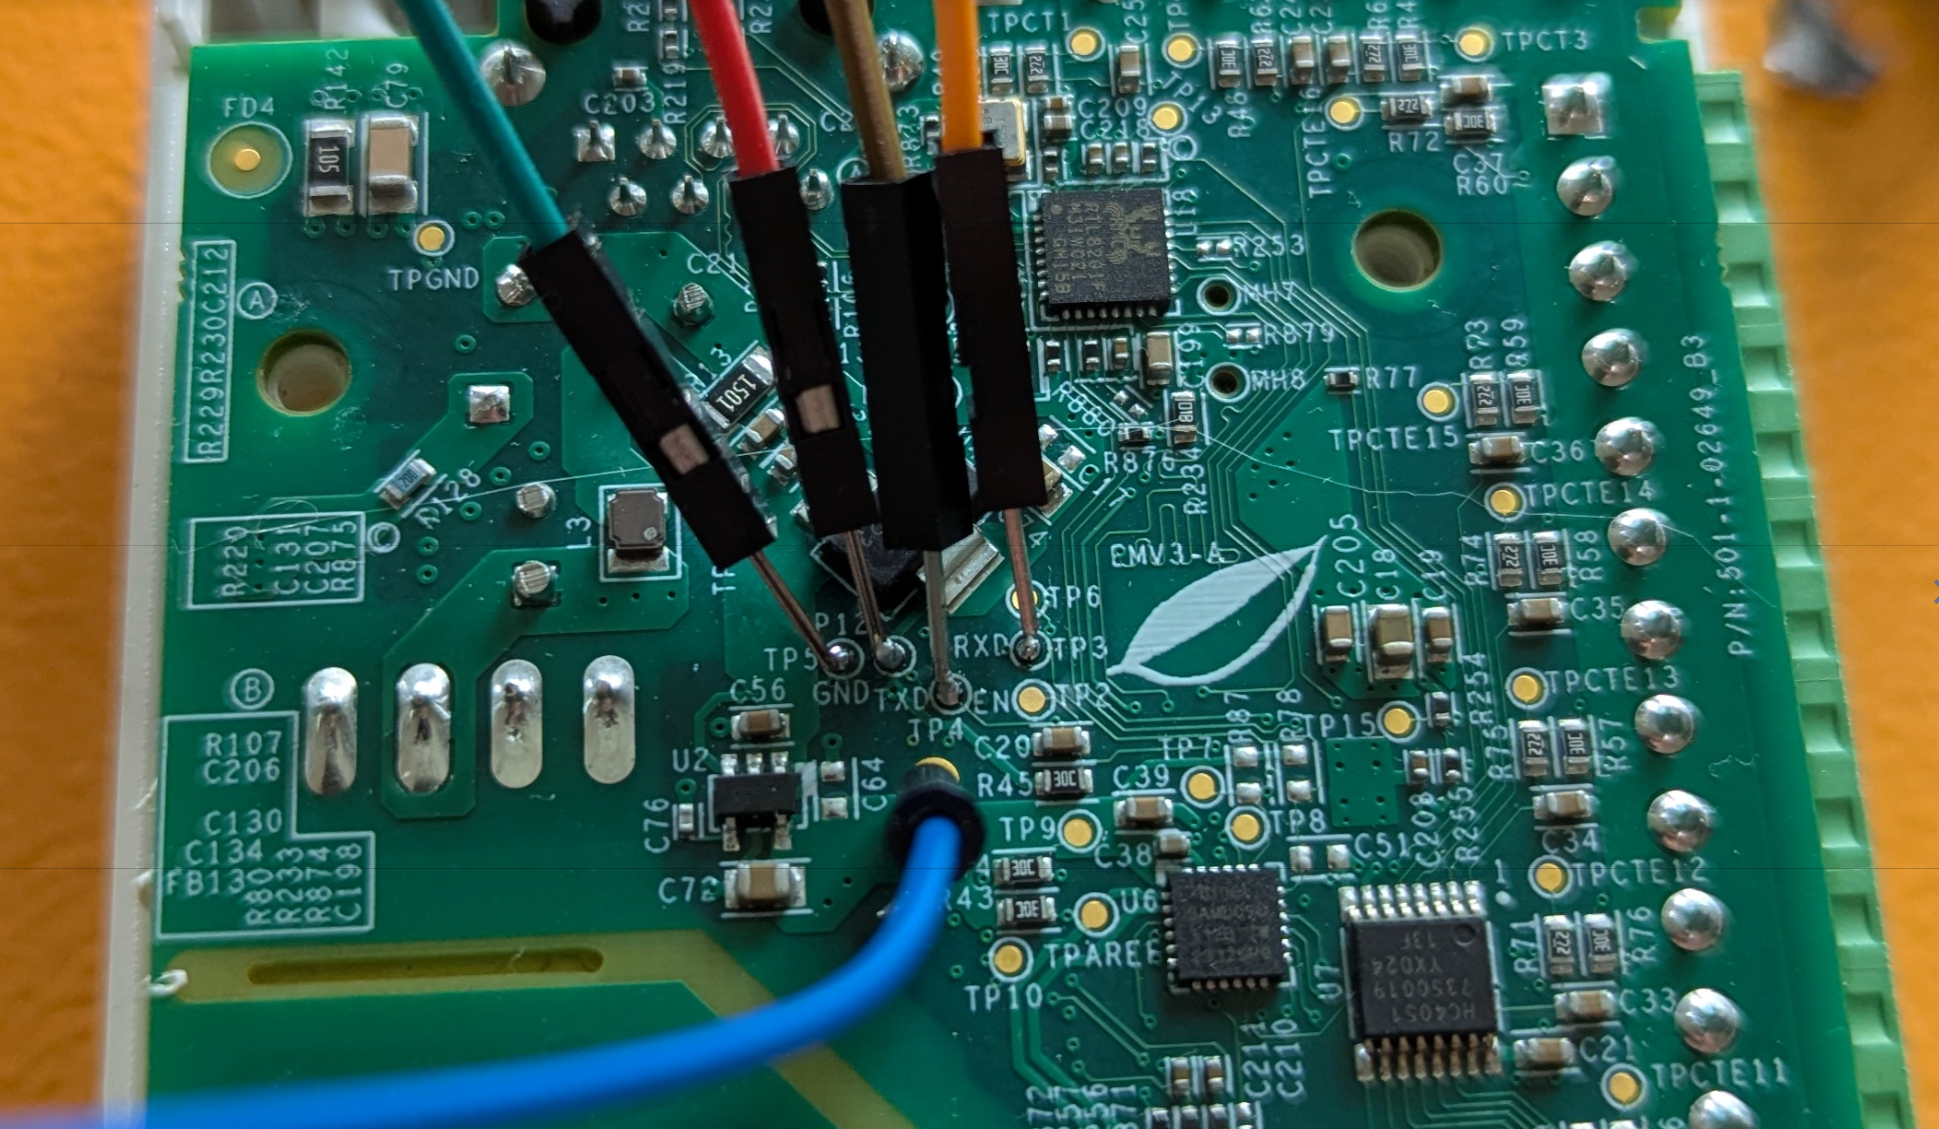
I decided to temporarily solder some connectors onto the Vue board to flash it. This was easier than I expected (as I’m still a novice solderer) and didn’t require any new hardware.
I then wired this to a USB TTL Adapter using a breadboard to connect the two grounds on the board with the USB groud.
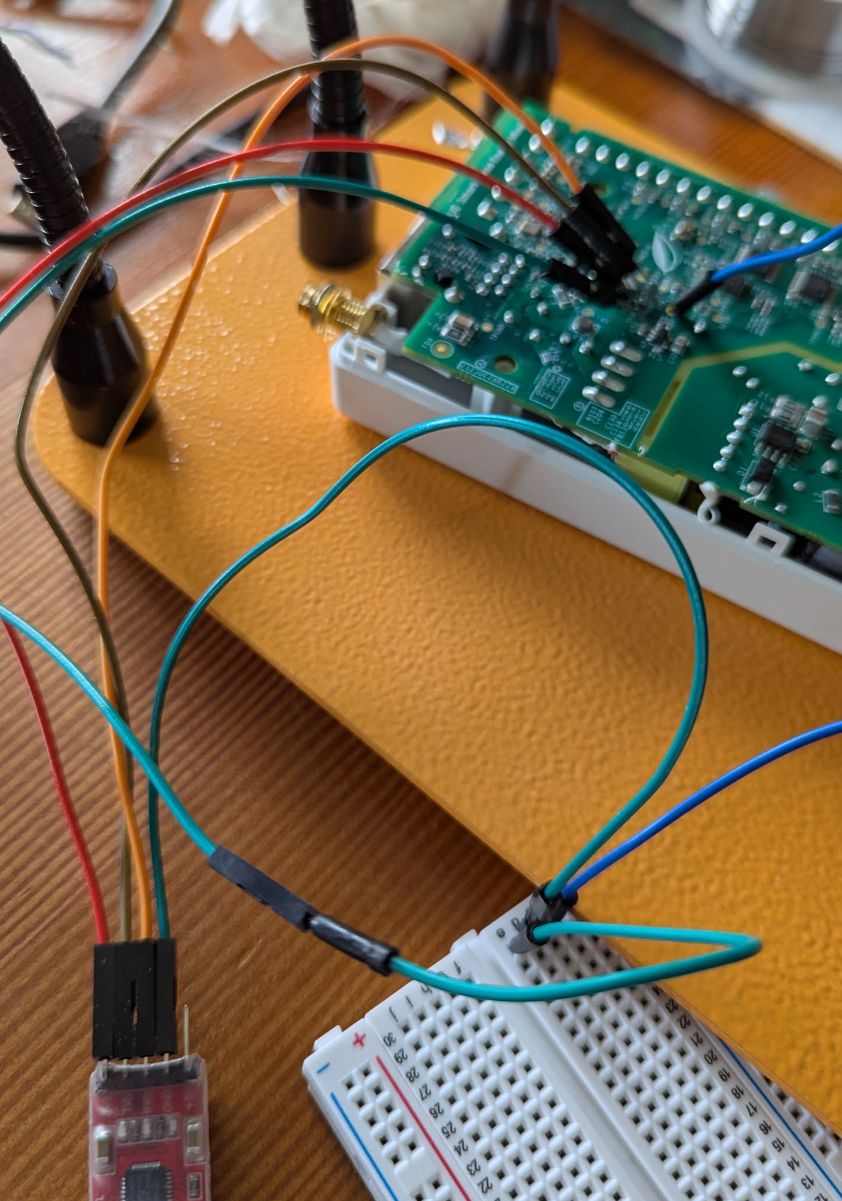
Reading the instructions took more time that getting it set up - probably ~5 minutes from start to connecting via USB.
Flashing
Doing a backup of the base firmware was smooth, and then flashing via ESPHome was equally easy.
I did run into some issues with the example ESPHome configs I found online.
- running
esptool.pygave mepermission deniederrors- need to set permissions after every USB reconnect with
sudo chmod 666 /dev/ttyUSB0
- need to set permissions after every USB reconnect with
i2cfrequency and timeout errors likeFailed to read from sensor due to I2C error 3- there appears to be a recent change causing
i2cerrors - see this discussion - recommendation has been to change the
frequencyto400kHzandtimeoutto1ms
- there appears to be a recent change causing
- getting zero or negative power values intead of positive
- if you are seeing zero values use the suggested troubleshooting and remove the filter for that circuit
- this is a pretty common issue in the discussion along with an explanation from
Cossidin this thread - many of my circuits were reporting negative values instead of positive despite ensuring they had the correct clamp orientation and phase configured
- switching the filters from
postoabsresolved this issue
ESPHome Config
Here is the config I ended up with:
esphome:
  name: iot-main-panel
  friendly_name: iot-main-panel

substitutions:
  display_name: iot-main-panel
  cir_1: "Water Heater"
  cir_5: "HVAC Upstairs"
  cir_13: "Freezer and Basement"
  cir_14: "Fridge and Kitchen"
  cir_20: "Car and Garage"
  cir_23: "HVAC Main"
  cir_39: "Steam Shower"
  cir_40: "Solar"

external_components:
  - source: github://digiblur/esphome-vue3@dev
    components:
      - emporia_vue

esp32:
  board: esp32dev
  framework:
    type: esp-idf
    version: recommended

preferences:
  # the default of 1min is far too short--flash chip is rated
  # for approx 100k writes.
  flash_write_interval: "48h"

api:
ota:
  platform: esphome

logger:
  logs:
    sensor: INFO

wifi:
  ap:
  ssid: !secret wifi_ssid
  password: !secret wifi_password
  on_connect:
    - light.turn_on: wifi_led
  on_disconnect:
    - light.turn_off: wifi_led

captive_portal:

# The web_server component creates a simple web server on the node that can be accessed through any browser and a simple REST API.
# This is not required for Home Assistant and can be commented out to reduce memory and processor utilization.
web_server:

# Provide diagnostic information about the platform.
text_sensor:
  - platform: wifi_info
    ip_address:
      name: "IP Address"
    ssid:
      name: "Connected SSID"
      disabled_by_default: true
    mac_address:
      name: "MAC Address"
      disabled_by_default: true

i2c:
  sda: 5
  scl: 18
  scan: false
  frequency: 400kHz
  timeout: 1ms
  id: i2c_a

switch:
  - platform: restart
    name: Restart

# The preferred way to get time in ESPHome is using Home Assistant. This is used for the daily energy use calculation.
time:
  - platform: homeassistant

light:
  - platform: status_led
    id: wifi_led
    pin:
      number: 2
      ignore_strapping_warning: true
    restore_mode: RESTORE_DEFAULT_ON

  - platform: status_led
    id: ethernet_led
    pin: 4
    restore_mode: ALWAYS_OFF

# these are called references in YAML. They allow you to reuse
# this configuration in each sensor, while only defining it once
.defaultfilters:
  - &moving_avg
    # we capture a new sample every 0.24 seconds, so the time can
    # be calculated from the number of samples as n * 0.24.
    sliding_window_moving_average:
      # we average over the past 2.88 seconds
      window_size: 24
      # we push a new value every 1.44 seconds
      send_every: 12
  - &invert
    # invert and filter out any values below 0.
    lambda: 'return max(-x, 0.0f);'
  - &pos
    # filter out any values below 0.
    lambda: 'return max(x, 0.0f);'
  - &abs
    # take the absolute value of the value
    lambda: 'return abs(x);'

sensor:
  - platform: emporia_vue
    i2c_id: i2c_a
    phases:
      - id: phase_a  # Verify that this specific phase/leg is connected to correct input wire color on device listed below
        input: BLACK  # Vue device wire color
        calibration: 0.0194  # 0.022 is used as the default as starting point but may need adjusted to ensure accuracy
        # To calculate new calibration value use the formula <in-use calibration value> * <accurate voltage> / <reporting voltage>
        voltage:
          name: "Phase R Voltage"
          filters: [*moving_avg, *pos]
      - id: phase_b  # Verify that this specific phase/leg is connected to correct input wire color on device listed below
        input: RED  # Vue device wire color
        calibration: 0.0194  # 0.022 is used as the default as starting point but may need adjusted to ensure accuracy
        # To calculate new calibration value use the formula <in-use calibration value> * <accurate voltage> / <reporting voltage>
        voltage:
          name: "Phase L Voltage"
          filters: [*moving_avg, *pos]
    ct_clamps:
      # Pay close attention to set the phase_id for each breaker by matching it to the phase/leg it connects to in the panel
      - { phase_id: phase_a, input:  "1",  power: { name: "${cir_1} Power",  id:  cir1,  filters: [ *moving_avg, *abs, multiply: 2 ] } }
      - { phase_id: phase_a, input:  "2",  power: { name: "${cir_5} Power",  id:  cir5,  filters: [ *moving_avg, *abs, multiply: 2 ] } }
      - { phase_id: phase_a, input:  "3",  power: { name: "${cir_13} Power", id:  cir13, filters: [ *moving_avg, *abs ] } }
      - { phase_id: phase_b, input:  "4",  power: { name: "${cir_23} Power", id:  cir23, filters: [ *moving_avg, *abs, multiply: 2 ] } }
      - { phase_id: phase_b, input:  "5",  power: { name: "${cir_39} Power", id:  cir39, filters: [ *moving_avg, *abs, multiply: 2 ] } }
      - { phase_id: phase_a, input:  "14", power: { name: "${cir_14} Power", id:  cir14, filters: [ *moving_avg, *abs ] } }
      - { phase_id: phase_b, input:  "15", power: { name: "${cir_20} Power", id:  cir20, filters: [ *moving_avg, *abs ] } }
      - { phase_id: phase_b, input:  "16", power: { name: "${cir_40} Power", id:  cir40, filters: [ *moving_avg, *abs, multiply: 2 ] } }

  - { power_id:  cir1,  platform: total_daily_energy, accuracy_decimals: 0,  name:  "${cir_1} Daily Energy" }
  - { power_id:  cir5,  platform: total_daily_energy, accuracy_decimals: 0,  name:  "${cir_5} Daily Energy" }
  - { power_id:  cir13, platform: total_daily_energy, accuracy_decimals: 0, name:  "${cir_13} Daily Energy" }
  - { power_id:  cir14, platform: total_daily_energy, accuracy_decimals: 0, name:  "${cir_14} Daily Energy" }
  - { power_id:  cir20, platform: total_daily_energy, accuracy_decimals: 0, name:  "${cir_20} Daily Energy" }
  - { power_id:  cir23, platform: total_daily_energy, accuracy_decimals: 0, name:  "${cir_23} Daily Energy" }
  - { power_id:  cir39, platform: total_daily_energy, accuracy_decimals: 0, name:  "${cir_39} Daily Energy" }
  - { power_id:  cir40, platform: total_daily_energy, accuracy_decimals: 0, name:  "${cir_40} Daily Energy" }
Dashboard
Now I get some nice per circuit usage information via the Energy Dashboard.
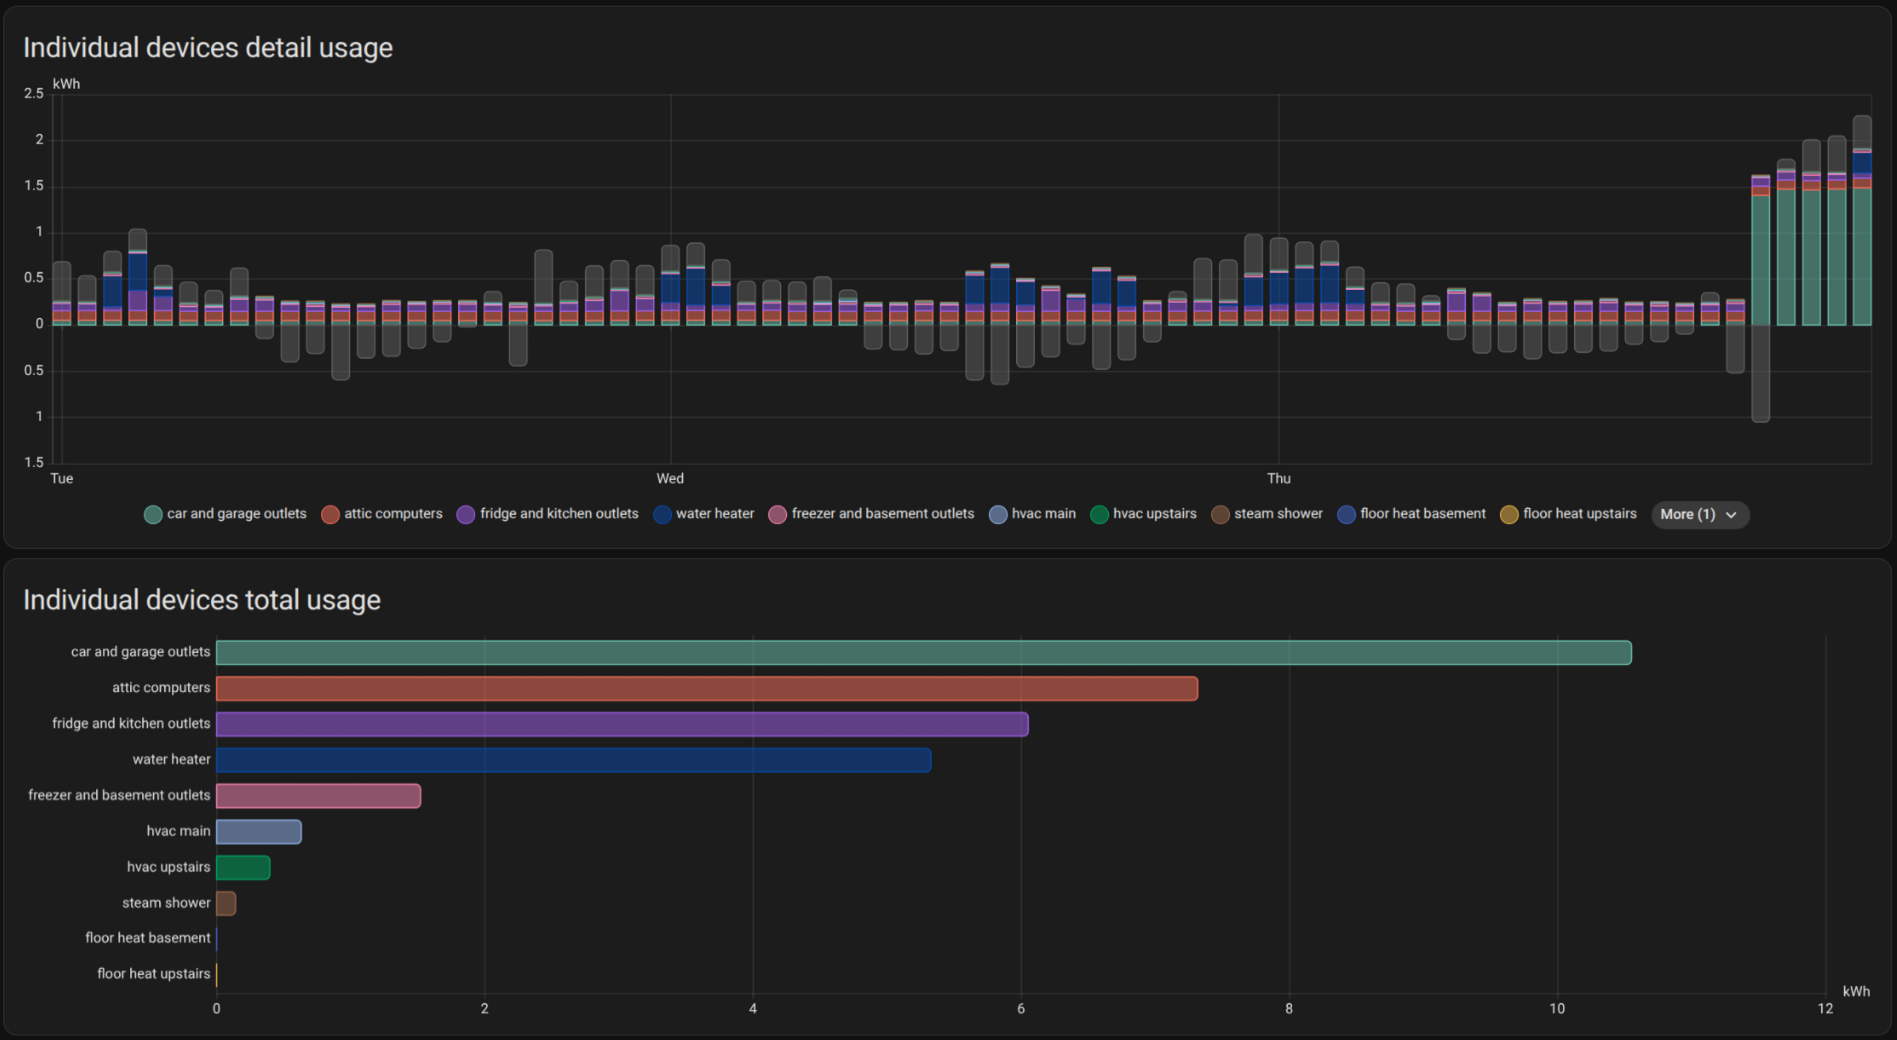
Looks like I have some work to do on improving the efficiency of my attic computers. :-)
Other Links
- Reddit disussion on this post
- intro to Esphome
- there is a lot of good infomation on the Vue 3 discussion thread